Sunday, April 21, 2013

The Sharksucker

This is a non-knitting post that will be most likely be totally uninteresting to anyone without an iPad. I felt obliged to blog about this cool little keyboard case because it's entirely obscure and deserves a little press. If you google Sharksucker, you'll be directed to (a) a Wikipedia article about remoras, (b) a bunch of websites that have no actual information about this keyboard case, or (c) a Chinese site written by the Sharksucker creators and translated into foggy English. What you will not find are any genuine reviews, comments, or even press releases about it anywhere else on the Internet besides the developers' own website.

Let me backtrack a bit here and say that when I bought my iPad last fall, I also purchased a Zagg keyboard case to go with it. In general, I like the case. It's solid and the keyboard itself is excellent. However, I was not in love with it for several reasons. First, once the iPad is inserted into the case, you can't get it out without a real struggle. That means that if you want to use portrait mode, charge the keyboard, or just grab the iPad to do a little bedtime reading, you're out of luck.

Second, the Zagg is limited to a single angle, and it's not a good angle for me--it's tilted too far back. This was a real problem for reading in bed, because I had to hold the iPad forward in an upright position with one hand. Third (and fourth), there's no wrist rest and the indicators are between the rear of the iPad and the case itself, so I had to poke my nose into the little space to see what the lights were showing. Finally, the Zagg case is heavy. I don't have the specs on me, but I would guess that it adds a half a pound of weight to an already zaftig device.

So I went on a hunt for another keyboard case that would address all these complaints. I watched more than a dozen videos and perused an equal number of "Best Keyboard Cases" reviews. Every case had a drawback, and I wasn't going to plop down another wad of cash for something that solved some, but not all, of my quibbles.

Thus, when I ran across the YouTube video for the Sharksucker, I was entranced. The video itself is, um, well, you just have to watch it yourself. It somehow amalgamates a commercial for feminine hygiene products with a cheap cruise advertisement. That is to say, there's a flower-filled field, drinks with paper umbrellas, beautiful ladies, and a great deal of hyperbolic voice-over.


However, they keyboard case itself seemed to be exactly what I was looking for. Considering that the price started at $169, was marked down to $99, and then when I actually placed the order, the cost appeared as $69...how could I resist?


It took about a week to arrive, and I have to say that I am impressed with it after using it for two days. I first had to extricate my iPad from the Zagg, which took about five minutes of prying, tugging, and cursing, and I broke a fingernail, too. I then plugged the Sharksucker into my laptop to charge it, which took about an hour. As you can see from the photo, the Sharksucker (where the heck did that name come from anyway?) can prop the iPad in either the landscape and portrait position by just picking up the tablet and plopping it into the brackets in either orientation.


It has a wrist rest. Because the iPad snaps into the brackets magnetically, the entire unit is solidly mated, but it's somehow still easy to pluck the tablet out in the evenings for bedtime reading. The angle is much better for me, and it's somewhat adjustable, although it doesn't tilt back very far.

The case is handsome, lightweight milled aluminum and feels sturdy and well-made. The keyboard is easy to type on, the keys themselves feel crisp and not mushy, and there are Page Up/Down/Home/End keys, which are missing from the Zagg. I do a lot of word processing with my iPad, and I really missed those keys. The Zagg does have Cut/Copy/Paste keys, but I use keyboard shortcuts instead, so those were a waste of key functions for me.

The only complaint with the Sharksucker keyboard is that the right shift key is too small and too far to the right, but I will adjust to it. My pinkie needs the exercise, anyway. Here are the two keyboards, so you can see the differences. The Sharksucker is above, the Zagg below.


Finally, according to the documentation, one charge of the keyboard battery will last for six months at a rate of two hours of use a day. The battery itself can be used to charge either the iPad itself or another device by plugging them into one of the two USB ports on the side of the keyboard. And there are little rubber bumpers to prevent the iPad from resting on the keyboard keys when the assembly is closed. True, this case, unlike the Zagg, doesn't protect the back of the iPad, which means that the unit has to be inserted into a sleeve to protect it from scratches when transporting it. A bubble-wrap baggie works fine.

I have to say that the JSXL Tech website makes for plenty of giggle-reading. For example, here are a few highlights of the Sharksucker:
  • The unique magnetic suction technical design can firmly suck Apple iPad.
  • Sharksucker adopts flip design,and then enables folding-closing.
  • Adopts high quality chocolate keyboard makes itself tidy and clean on vision.
The formatting on the website is pretty lame and the English is even lamer, but it contains a wealth of inexpensive Android tablets that actually are a good buy if you need a cheapo unit for the kids. There are also unlocked global smart phones and tons of keyboards, with or without a case, at very reasonable prices. And they actually respond to emails!

Monday, April 8, 2013

Flat Rat Pack

I know, the posts are few and far between. But, as I stated a long time ago, I only post when I have something to say that I think my readers would want to hear. Listens to the annoyed mumbles. Well it's true. You don't want me to start posting recipes for beets, do you? I could do that, you know. And add some pictures of the grandkids at Disney World. Looks offstage. Well, they don't have to know we don't have grandkids. I won't tell them if you don't.

 ==> Beet lovers, please, no emails, phone calls, or howlers.

I haven't been blogging lately mostly because I haven't been knitting very much. I did finish a Bohus sweater, though. Considering it was knit with a heavy laceweight yarn, it took me a couple of months to finish. That's my excuse, and I'm standing by it.


Well, back to the rats. Those of you who spin know Neal Brand, a maker of exquisite supported spindles and, incidentally, a math professor. For this past term's project, Neal had his calculus students design the perfect supported spindle. He then turned a sample of each project on a lathe. The results are diverse, imaginative, and of course, incredibly beautiful. They can be viewed by cruising Neal's thread in Spindle Candy, starting around here. Neal kindly allowed me to choose one of the designs and made me my very own Flying Saucer of Awesomeness.

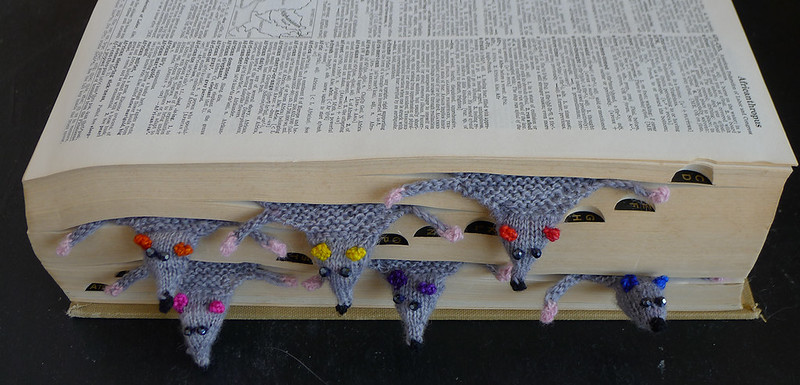
In return, I offered to spin some yarn with the FSoA spindle and make each of the students involved in the design process their very own Flat Rat Bookmark, an item which no one, especially calculus students, should be without.

Note that if you have converted your entire library to eBooks, you can just drape your Rat over the top of your reader to keep it warm. (I notice that the pronoun "it" in the last sentence is ambiguous. The answer is yes, you can keep either the rat or the reader warm.)

The original design, The Squashed Rat Bookmark, is cute, but I wanted something, um, rattier. You know, with a pointier nose, fatter body, and beadier eyeballs. And thus, I spent some time with needles and crochet hook developing a pattern so all of you can make your very own Flat Rat. Mine were made with fingering-weight handspun Tasmanian Corriedale, which, oddly enough, is the stuff Malcolm Fielding's spindles come wrapped in. I dyed the finished yarn Rat Gray, of course.

Here's a close-up of the completed Flat Rat. 


 And here's photo of the Flat Rats in action:


When not in use, these rats stack well.


Head

Make a provisional crochet chain and pick up 18 stitches. Circularize on two or more needles. I found the crochet provisional method the easiest way to make the head. I made decreases on both sides of the head, which produced a pointier nose than decreasing around a single stitch, like you do for a sleeve.

knit 4 rows
knit 3, ssk, k8, k2tog, k3
k1 row
k3, ssk, k6, k2tog, k3
k1 row
k3 ssk k4, k2tog, k3
k1 row
k2 ssk, k4, k2tog, k2
k1 row
k2, ssk, k2, k2tog, k2
k1 row
k1, ssk, k2, k2tog, k1
k1 row
3 st left on each needle.

Join black yarn for the nose.
k1, ssk, k2tog, k1
knit 1 row

Run black tail through stitches, run black through stitches again until nose is roundish--about three times. Pull all ends inside of the head.

Stuff head.

Turn the head around and pick up 18 stitches in such a way that the decreases fall on the sides of the head and aren't obtrusive. Put nine stitches on each of two needles.

Do a 3-needle bind-off by knitting together one stitch from each of the two needles. That is, insert the third needle through a stitch on the front needle and a stitch on the back needle and knit both of them off. You now have 9 stitches. Or you should. If you have ten, well, just go with the flow.

Body

knit 2 rows
k1 kfb (knit in the front and back of the stitch to increase), knit to the last two stitches, kfb, k1.
k1 row
Repeat increases 2 more times, to 15 st. That is, increase row, plain row, increase row.

For the first leg, cast on 6 gray and 2 pink stitches by knitting on. Bind off two stitches in pink and the rest in gray.

Knit to end of row, turn and repeat leg on other side.

Resume increases 4 times until you have 23 st. After each increase row, knit a plain row.

Knit 9 rows.

Decrease back to 11 stitches via these two rows:
k1, ssk...k2tog, k1.
k1 row

Do another set of legs.

Repeat the two decrease rows three more times--you will have 5 stitches on the needle.
Bind off.

Bits

Crochet a chain for the tail. Double yarn between bound-off stitches, chain 17. Knot the ends and trim. Or knit an I-cord. The chain is flatter, but you will probably have to wet and pin it to make it lie flat. Mine curled up into pigtails, which would have been terrific if I were making flat piglets.

Knot pink paw ends together and weave in ends.

Ears are crocheted directly to the head.
SC in two stitches, ch1, turn, single SC, bind off, run ends through head. Or make any other teeny blob-shape using a needle, hook, loom, or potato peeler.

I dampened my rats and pinned them out to make them flatter...I hope PETA doesn't see this picture....


You could just squish the rat in an unabridged dictionary or a Uline catalog for a while if this concept makes you squeamish.

And finally, if you have no inclination to knit a flat rat, you could make one using this handy method:


BIG NOTE

I want to remind everyone that I can't respond to comments without an email address, Ravelry name, or other means of contact. Too often these days there's just no way for me to thank you for your comment or answer your question. Along these lines, I notice fewer and fewer active Blogger profiles. That makes me sad, but as technology and social networking advance, sites such as Facebook and Ravelry have replaced blogging as a primary means of communication. And no, I don't have a Facebook or Twitter ID. I think Facebook and Twitter are creepy. However, you can always ping me on Ravelry if you don't want to leave a public comment.